.
.
.
.
When it comes to installing a chimney, it can seem like a daunting task. But with the right guidance and the right materials, it’s not an impossible task at all. In this guide, we will go through the steps to install a Vento chimney and explain what the different components are used for.
Before we begin, it is important to note that the installation of a chimney must comply with local regulations, and it is always a good idea to consult your local chimney sweep, as he must approve the chimney before you can use it. Many skilled Vento chimney dealers offer free advice and tailored solutions for your needs, so don’t hesitate to contact one of our dealers if you have any questions.
Before you start installing your chimney, it is important that you make sure that your wood-burning stove is set up correctly.
Here you need to think about:
The first step in any installation is to plan. You need to decide where your chimney will be placed and whether you want a top or back exit on your fireplace or stove. This will also help you determine which components you need for your installation.
When you choose your chimney to have a top outlet, your flue pipe comes out of the top of the stove. Thus, the chimney runs vertically up and out through the ceiling and roof.
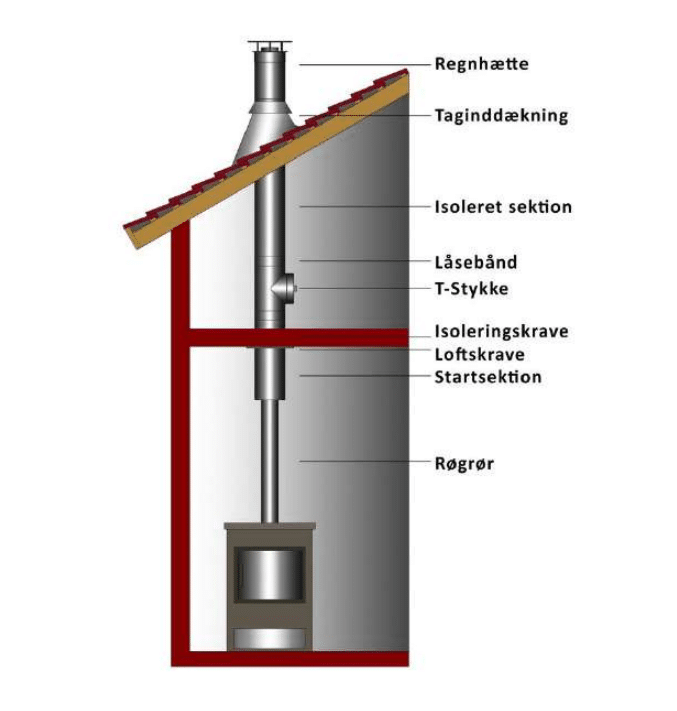
Once the fireplace is set up correctly, mark the center of the hole to be cut in the ceiling using a plumb line or a line laser. A hole is then cut in the ceiling that is large enough to ensure that the minimum distance to flammable material is observed. Distance to flammable is min. 50 mm (CE marking G 50).
To ensure a tight penetration in the vapour barrier, Vento climate foil can be mounted tightly around the
the chimney in the storey.
In the case of a closed storey penetration, the building insulation is cut away and insulated against the chimney with ordinary building insulation (glass/stone wool). For insulation thicknesses above 240 mm, an air space of 50 mm is left around the chimney from the insulation collar to the top of the insulation layer.
When you need to cut the hole in the roof, mark the center again, using a plumb line or line laser. You should also be aware of the rules on distance to flammables. Roof tiles or roof sheets are removed to the extent necessary.
Here, the chimney behind goes out of your wood-burning stove, and directly through the outer wall, after which it breaks 90 degrees and goes up along the outer wall, and up over the roof.
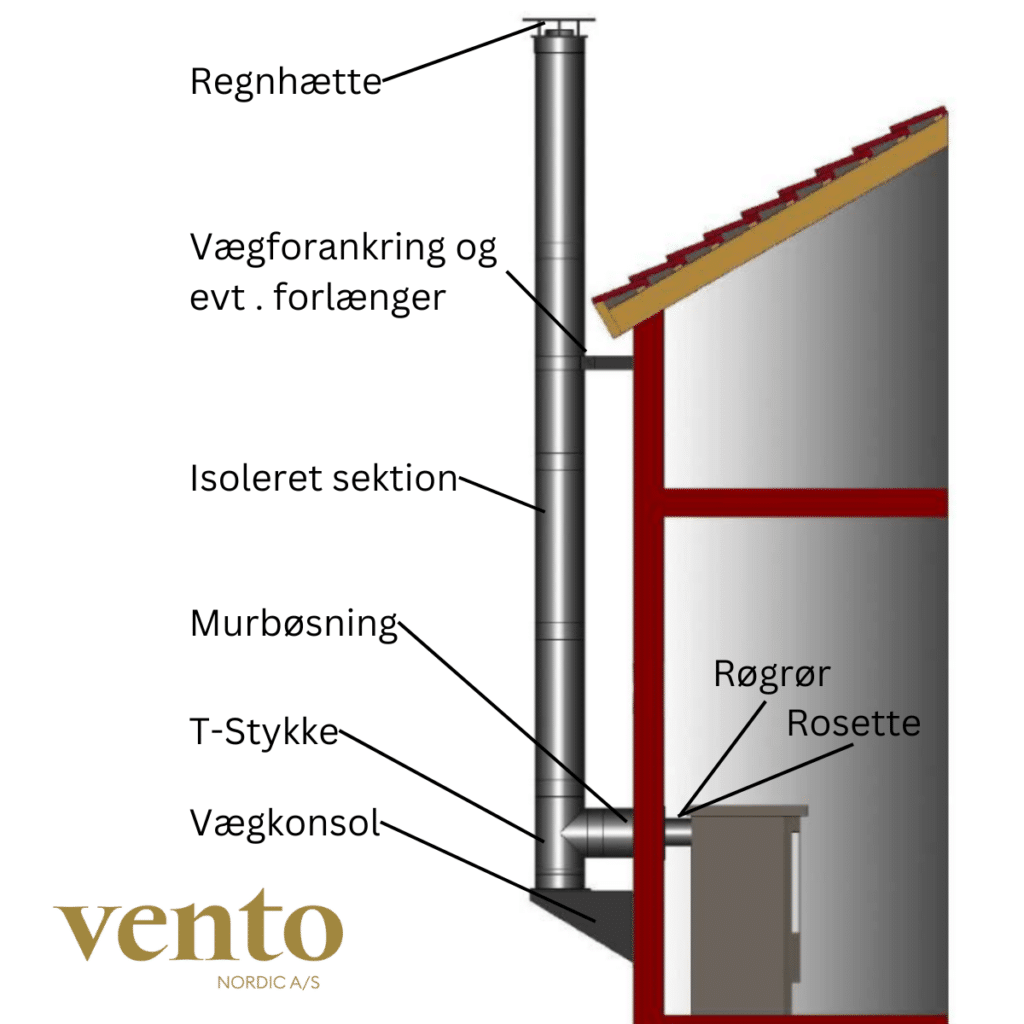
When you do a wood-burning stove installation with a horizontal connection, it is usually because the wood-burning stove is located at an outer wall and you want the chimney on the outside of the house. Therefore, a hole must be made in the outer wall for either an uninsulated flue pipe or an insulated chimney element. The latter is the most comprehensive but also clearly the best. An insulated chimney element must always be used when the wall is made of flammable material. You can use the solution with the uninsulated flue pipe when the wall is not made of flammable material.
If your wall is made of combustible material, cut a hole in accordance with the building regulations. When your wood-burning stove is in place, measure the height of the smoke outlet and mark it on the wall. The wall hole is cut/cut so large that the element can go through freely. Once the element is in place, it can be installed with an insulation collar around the insulated section, and a cover around the cut-out can be made with ceiling collars on both sides.
The minimum distance to flammable material is 50 mm.
Be aware of the greater distance requirement for any uninsulated connection pipes.
You mark the hole in the same way as I have described above. The flue pipe is cut freely and it is mounted with masonry bushings outside and inside. On the outside, the flue pipe is led to the transition on the insulated T-piece.
Inside, cover around the flue with a decorative rosette.
On the outside of the wall, the chimney element or transition must be connected to a 90 gr. .
The T-piece should stand downwards either on a wall bracket or a floor bracket, fixed or adjustable. Under the console, there must be space for the soot bowl to be removed before emptying.
From the top of the T-piece, insulated chimney elements are installed in height. For every 4 mtr. a wall anchorage is installed, which, like the wall console, is available with different distances between the chimney and the
wall, or you can use our extension for wall anchoring. The chimney may not exceed 1.5 m past the top fastener. Very high chimneys must be relieved with support pipes or with guy ropes and wire.
The chimney must always be finished with a cap and possibly a jackdaw.
After you have installed your chimney, you must contact your local chimney sweep who will ensure that everything is OK and approve the installation before you can start using it. Here you will find a list of local chimney sweeps.
Now that your chimney has been installed and tested, it’s time to enjoy your fireplace or wood-burning stove! With a properly installed Vento chimney, you can be sure that you are getting the most out of your heat source.
Installing a chimney can seem like a big task, but with the right guidance and materials, it’s actually a task you can handle yourself. We hope this guide has provided you with the information you need to install your Vento chimney safely and efficiently. Remember that the many dealers of Vento Chimney are always ready to help if you have questions or need advice and not least if you want a professional chimney fitter to do all the work.
Clitoris: